|
76sqft Balanced Lug
A 76sqft Balanced Lug is a very versatile sail - it is sufficiently
large to drive the boat well in light winds and can be reefed
down if the wind picks up. The dimensions for the foot, luff,
head and leech are specified by Jim Michalak and this sail
is used on several of his designs.
The specifics of this design (rounding and reinforcement)
are unique to this page. Several of these sails have been
built and owners report they work very well. Use heavy (5.5oz)
tarp, #16 needles, upholstry or outdoor thread, and high thread
tension.
The concepts presented in this essay apply well to any sized
Balanced Lug - just make sure you plan well if you anticipate
making any changes.
|
|
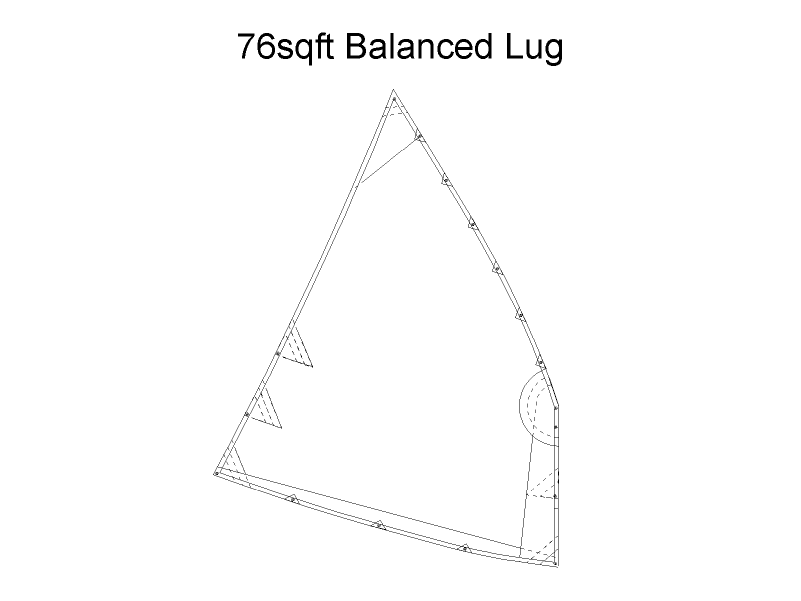
Overview of the sail as it will look when complete.
|
|
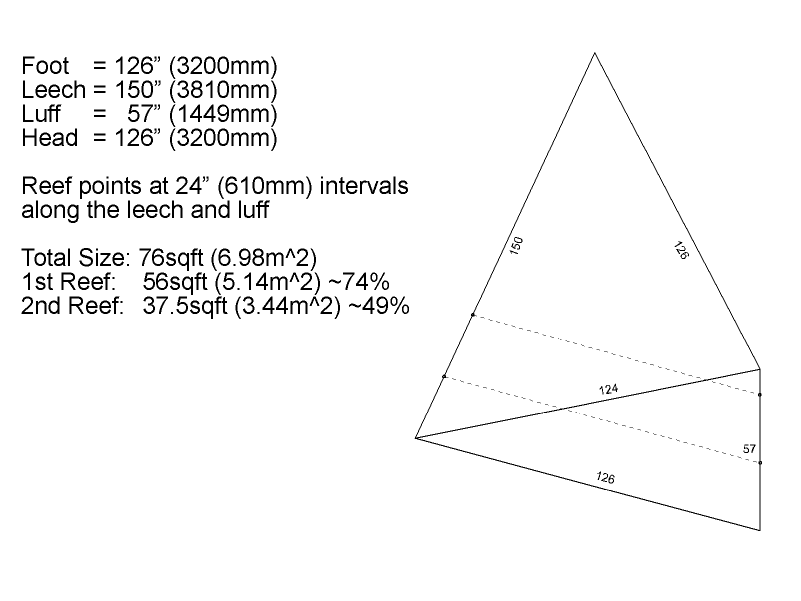
The general dimensions come from the sail used on the Michalak
Laguna. This lugsail is very versatile and is used on
several of Michalak's designs.
Jim
Michalak's boat designs on Duckwork's
Boat Builder's Supply
|
|
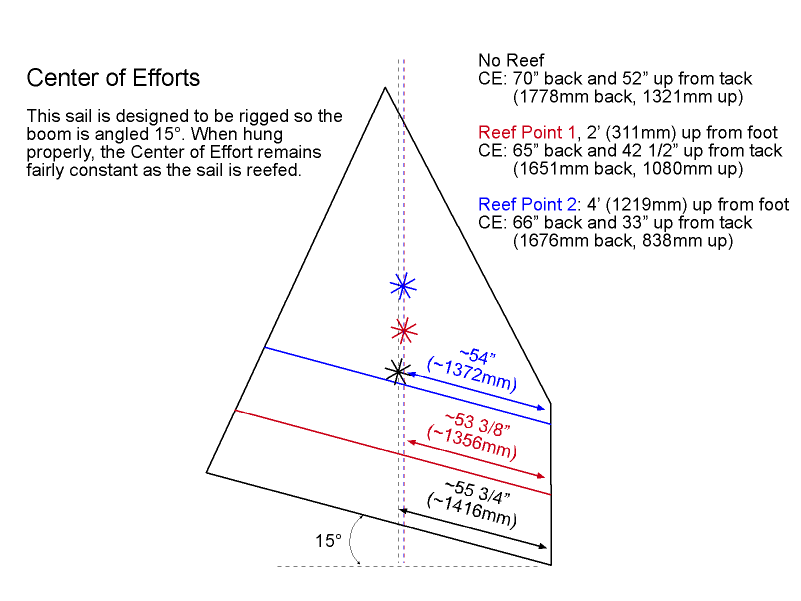
This diagram shows the Center of Efforts for the three reefing
possibilities.
When the sail is rigged properly so the boom is angled at
15°, the CE hardly moves forward.
|
|
I am not an expert sail designer. I have consulted heavily
with Michael Storer of Storer
Wooden Boat Plans and designer of the Oz
Racer Mk2. I have interpreted his patent attempts to educate
me into the following design.
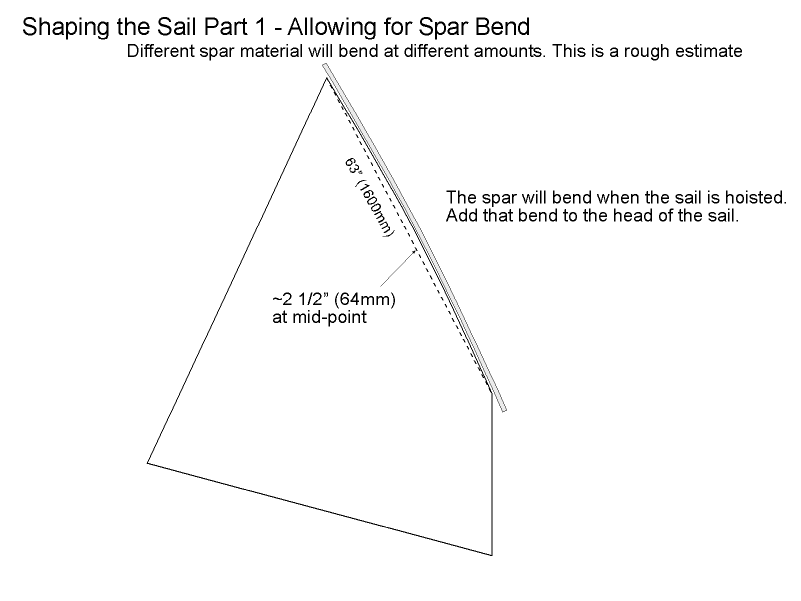
The first consideration is how much sail material to add
to take the bending of the spars into account. When hung properly,
the yard will be under stress and will bend.
I have estimated the spar bend at about 2 1/2" (64mm)
when rigged. This is a guess, but it is my guess, so I am
sticking to it.
|
|
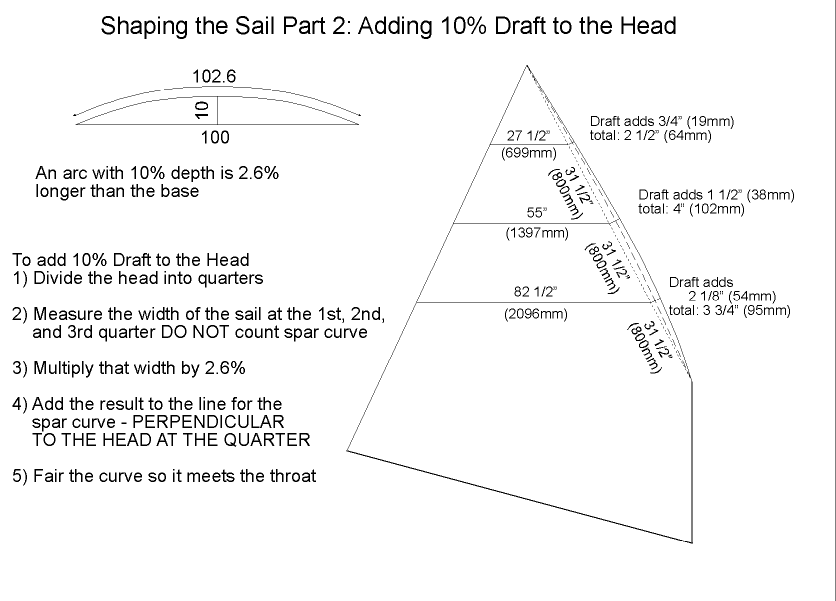
The draft gives the lee side of the sail an airfoil shape,
providing lift and pulling the sailboat along.
PDRacer.com says we should have a draft of about 10% centered
about 30% back. You need to add material to both the head
and foot to get draft - we shape the foot in the next slide.
It took me some time to digest, then regurgitate these instructions.
If they are confusing, look at them again.
|
|
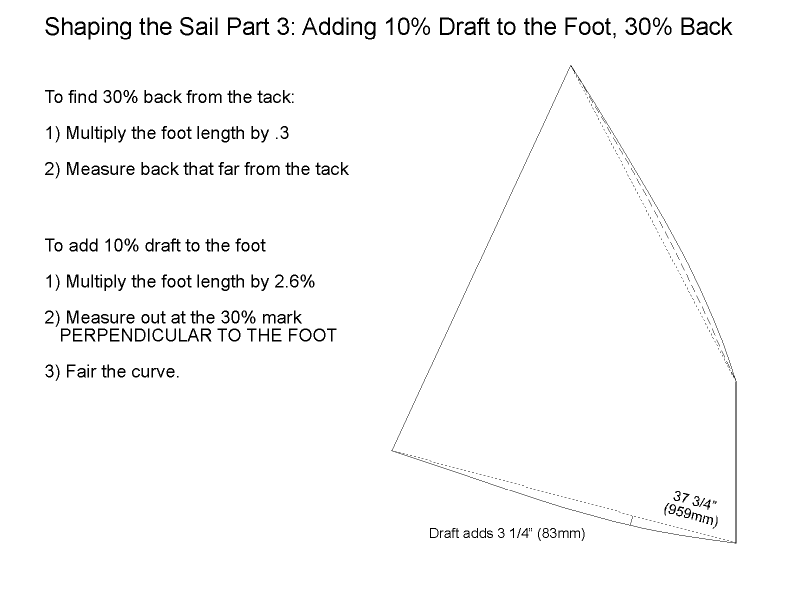
As the head is shaped, so is the foot. Your sail should now
have a nice, 10% draft 30% back.
|
|
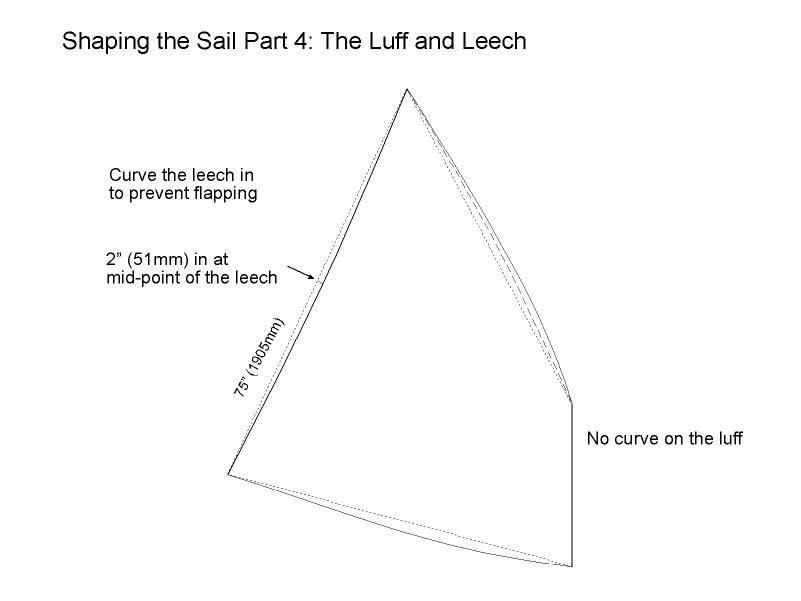
The final thing to do is add some negative curve to the leech.
Without negative curve, the leech will flap. I dunno how debilitating
having a flapping leech is, but I do know it is damn annoying.
|
|
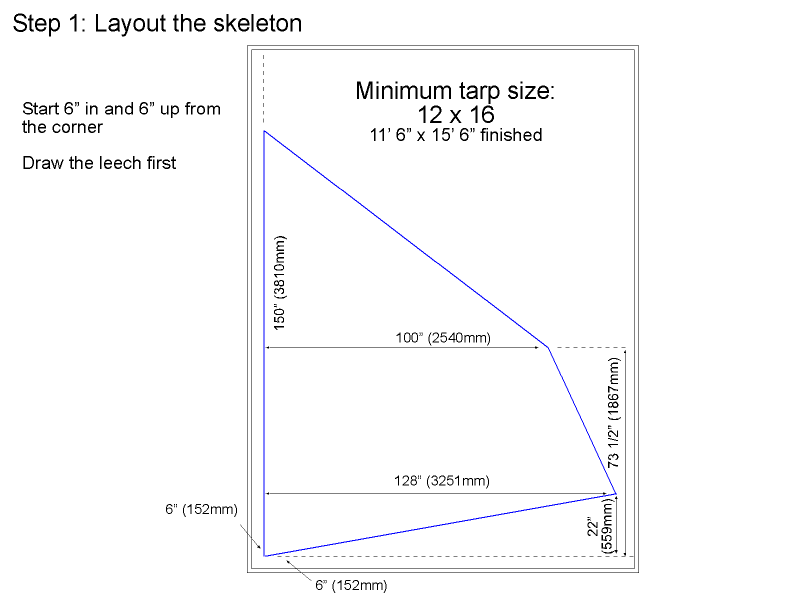
For me, layout is the most difficult part. Finding space
large enough is actually the most challenging aspect. Then
you have to have battens long enough to reach from clew to
peak, and a 13ft bendy stick can be hard to come by.
Considerations for the tarp material: I like using very light
tarp to minimize the weight aloft. The 3.5oz stuff you can
buy at any "big box" store works fine. If you are
making a Puddle Duck Racer, the best value for your money
will be the 12x20 PDRacer Racing Polysail kit from Polysail
International. Just let Dave know you are making this sail
and have your PDR hull number ready.
Start by spreading your tarp out and making your reference
point. Everything is measured from there
|
|
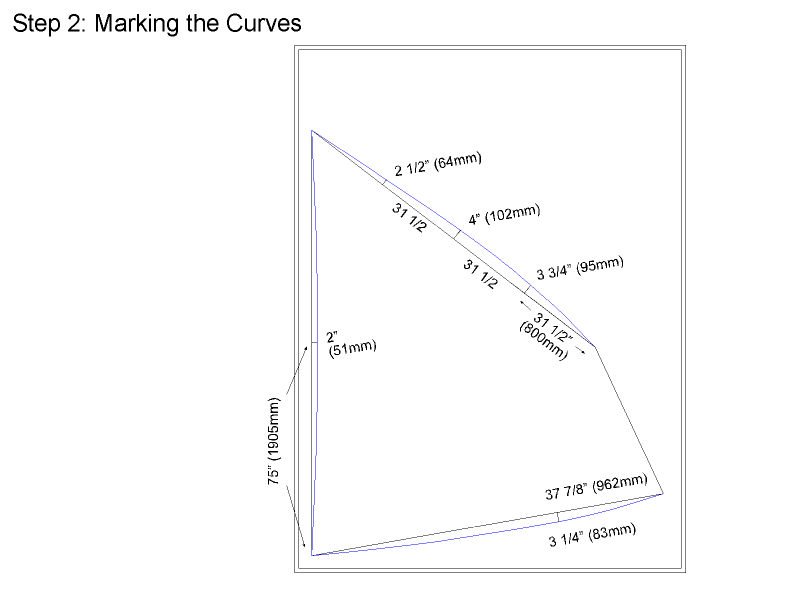
Mark your inflection points and fair with your batten. This
goes easier if you have help.
|
|
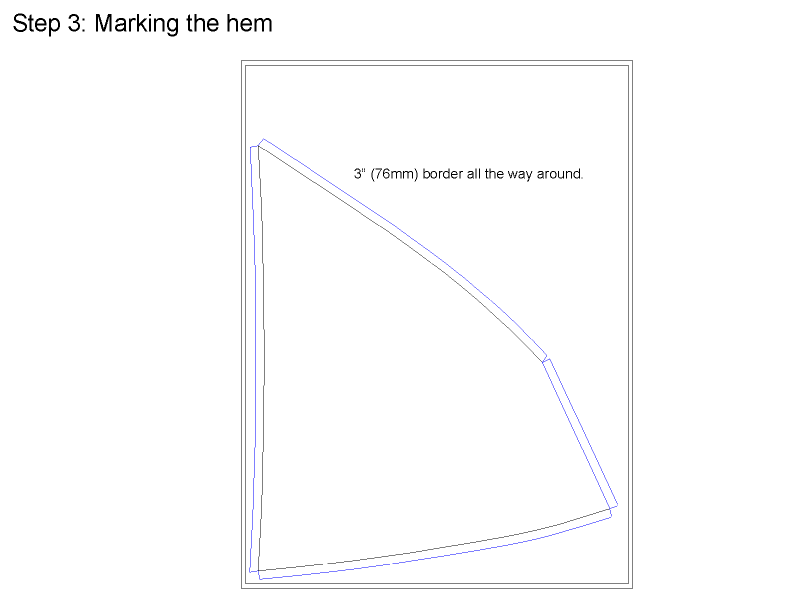
The hem will be folded over twice, then stitched to the sail.
I like to have 3" of hem material so the final hem is
1 1/2" wide.
Once you have the sail marked, you can cut it out.
|
|
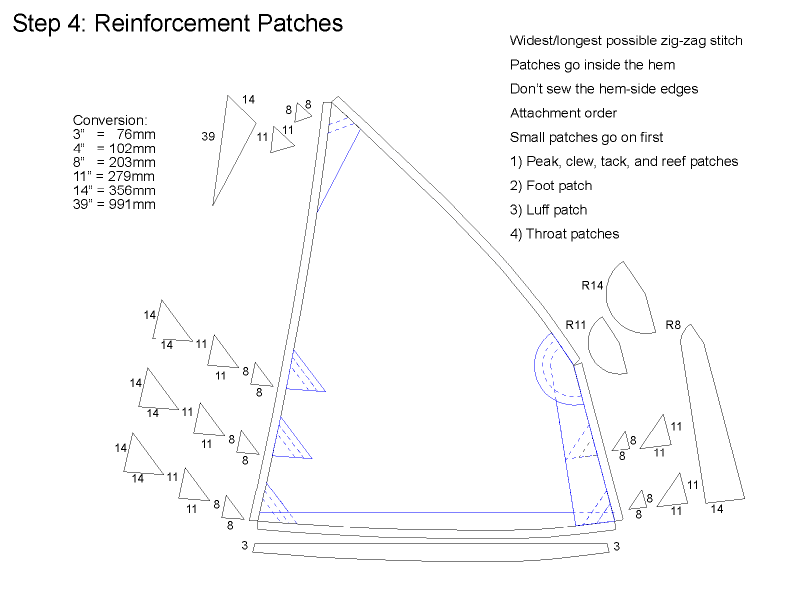
The reinforcement patches are the brilliant part of this
sail design (not my concept - I lifted this straight from
Michael Storer, Storer Boat Designs.) Each corner will have
a minimum of 9 layers (sail, 3 patches, and 2 layers of hem
from each leg of the corner.) The reef points will have 7
layers, and the grommet patches will have 5 layers.
|
|
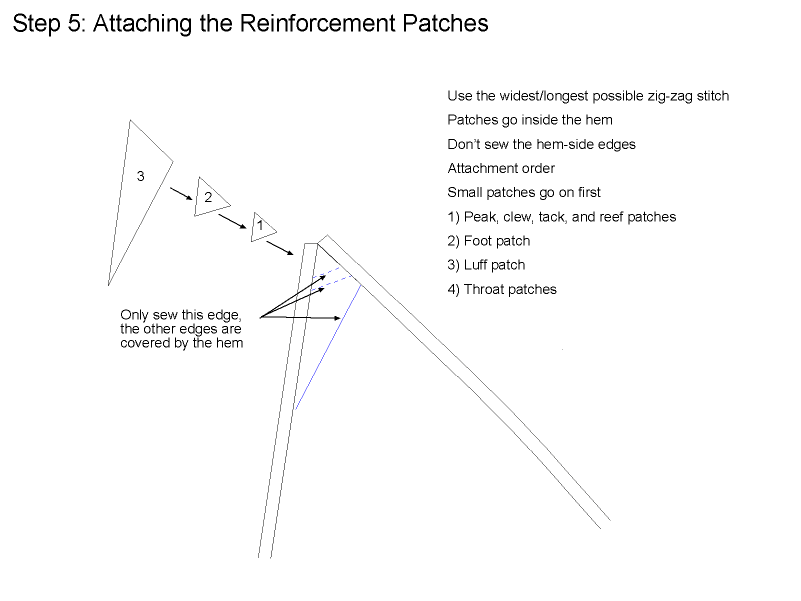
I only stitch the sail edge of the patches as the hem will
be folded and double stitched over the patch.
|
|
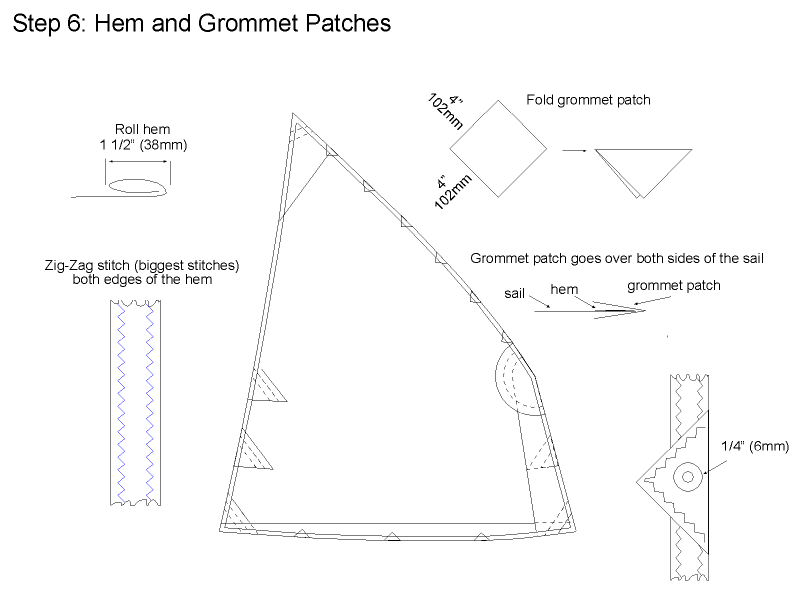
I just more or less evenly space the grommet patches. The
foot of the sail does not need as many patches as the head.
|
|

And there you have it - hang the sail so the luff (front
edge) is straight up and down. This will angle the boom by
15° and allow you plenty of room under the sail while
keeping the Center of Effort roughly the same as it is reefed.
Please refer to Mik Storer's excellent writeup on Lug
Rigging for further information
|


