|
Lengthening Wood Most boats are longer than a standard sheet of plywood. While you can purchase plywood in lengths longer than 8', it can be expensive and difficult to find. This essay shows three methods of splicing shorter pieces of wood into one longer piece. Method 1: The Butt Joint The easiest way to join two pieces of plywood is the simple Butt Joint. It is fast, cheap, and easy, but some people find the joint 'unsightly.'
The butt strap usually has the same thickness as the plank (it is most often of the same material) and should be 16 to 20 times as wide as the plywood is thick. 1/4" ply will require a butt strap 4" to 5" wide. The butt strap is glued to the inside of the plank - usually the 'bad' side of the plywood. Some people find beveling the edges of the strap gives it a more aesthetically appealing look.
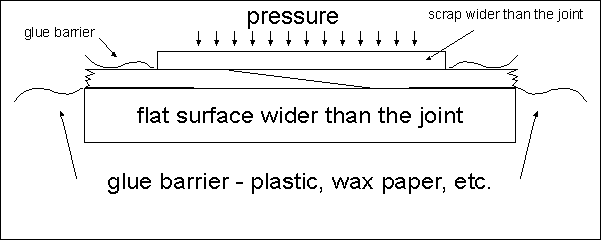
Support the joint on a flat surface and apply uniform pressure over the entire butt strap while the glue cures. Remember to lay down a glue barrier!
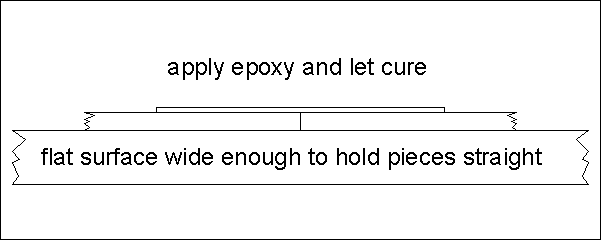
Note: Because the butt-strap makes the joint twice as thick as the rest of the plank, the joint will not bend as easily as the rest of the plank - resulting in a 'hard spot.' If you are making a curved boat, you can mitigate the hard spot by putting your joints where the plank will bend the least or beveling the face of the butt strap to match the curve. Method 2: Fiberglass Butt Joint Another method of joining plywood was popularized by Harold "Dynamite" Payson - using fiberglass tape and epoxy to make a light, strong, smooth joint. It is said Payson grinds a hollow area under the fiberglass so there is no visible bump. Experience has shown that step is an unnecessary complication for little aesthetic value - the edges of the fiberglass can be sanded so the join is nearly invisible.
The fiberglass tape should be much wider than the plywood is thick - 3" to 4" for 1/4" ply. The on-line chandlery Duckworks Boat Builder's Supply is an excellent source for both fiberglass tape and epoxy.
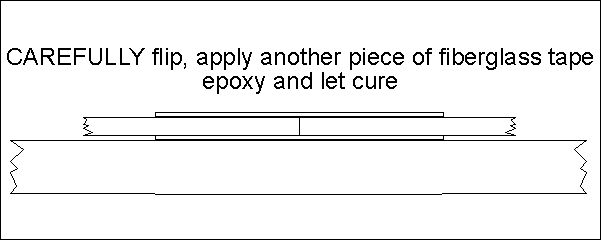
This is a 2-stage process - first one side, then the other. You want to make sure the joint is firmly pressed together - perhaps holding them in place with temporary screws.
The most difficult part of doing this type of joint is turning the plank over to apply the second piece of fiberglass tape. If the first joint cracks, you'll need to start over. Have a friend help, or attach some temporary battens to hold the joint steady.
Once the epoxy has cured on the second piece of fiberglass tape, you have a very strong, secure seam. The edges can be feathered so the seam becomes almost undetectable. Method 3: Scarfing Scarfing plywood also makes a very strong, smooth joint and it does not require fiberglass tape or a two-stage gluing process. It does, however, require some preparation and since you are overlapping the ply instead of butting it, your resulting plank is slightly shorter than either of the previous methods. Make sure you take this into account before starting.
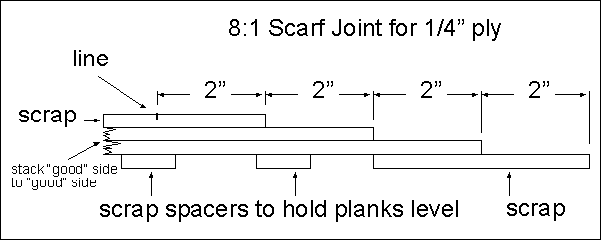
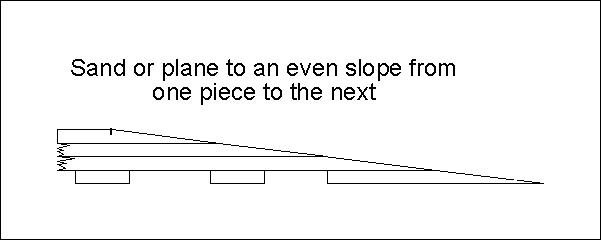
The trickiest part of a scarf joint is getting the angle for the joint. Most people recommend a 8:1 or 12:1 scarf angle. 8:1 is usually sufficient, but different builders have different preferences. There are many ways to get the scarf angle, including making a jig for your tablesaw or circular saw. Another common method is to stack the planks and use a hand plane, power plane, or belt sander to shave off the angles. For 1/4" ply, an 8:1 scarf will have a 2" wide joint (12:1 will have a 3" wide joint.) Stack the planks face to face (or back to back) so you'll have "mirror images" for the joints.
Use a very sharp hand plane or fairly sharp power plane so you don't chew up the softer inner layers of your plywood. Use a very coarse grit (34 or 40) if using a belt sander or you'll be sanding all day. Take your time and enjoy the process. Once you've obtained the angle, the feathered edges will be delicate, so handle the planks with care.
Apply your glue and apply pressure. Remember to lay down a glue barrier!
Here's a couple other links to more information on scarfing - look: It doesn't have to be this hard. Don't let these scare you. And now for even more ways of joining ply - for those for whom the previous examples were just not complex enough:
|


