ROUTE 623 P. O. BOX 307
GLOUCESTER, VIRGINIA 23061
(804) 693-3818
Newport 16
Rigging and Handling Instructions
LOA: 15' 7"
LWL: 14' 0"
Beam: 6' 3"
Hull Weight: 900lbs
Ballast: 200lbs
Draft Keel Up: 9"
Draft Keel Down: 3' 9"
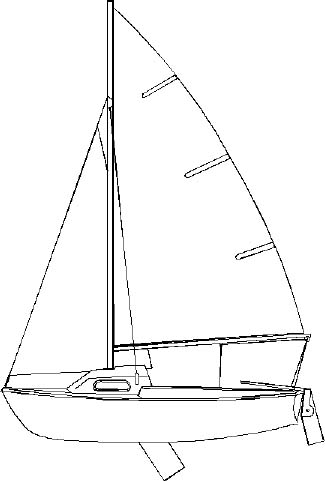
THE NEWPORT 16
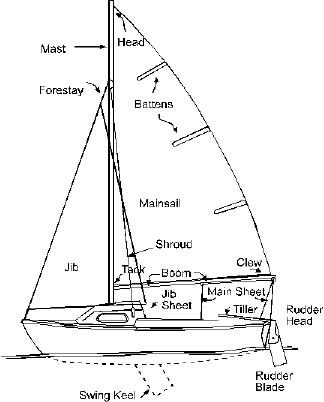
Now that you have your Newport 16, let's introduce you to the various parts and tell you how to rig and sail her for your greatest safety and enjoyment.
The basic parts of your Newport 16 consists of the hull, mast and rigging, swing keel rudder, tiller, boom, sheets, mainsail and jib
. 
Your swing keel has already been installed at the factory. This is controlled by a brake winch. Be sure to keep fingers away from the winch. Particularly, be careful not to let children handle this piece of equipment.
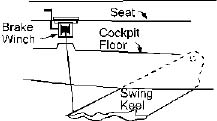
When sailing, your swing keel will normally be kept in the fully lowered position. To retract the swing keel for shallow water, turn the winch handle in the direction which will result in the winch "clicking". Turning the handle in the opposite direction will lower the swing keel.
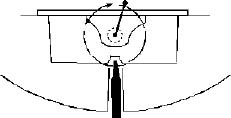
If it is ever necessary to completely remove the swing keel from the boat, it must be removed through the bottom of the hull. To do this, turn the boat on its side, then pivot the keel into its fully down position. The keel is pivoted around a boat in the upper forward corner of the trunk. Remove the pivot bolt to remove the keel and undo the shackle which attaches the lifting pulley to the keel. The keel can also be removed by lifting the boat up on a hoist, and dropping the keel directly down. Support the hull, using this method, to avoid the possibility of the boat falling on anyone.
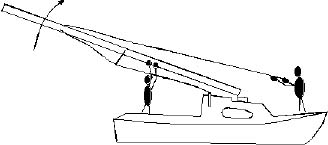
STEPPING THE MAST
CAUTION: Before stepping the mast check for overhead power lines.
The mast can be stepped either with the boat afloat or on the trailer. To do this, first place the mast on the boat with the foot of the mast located on the cabin top and the top of the mast extended out over the transom. Attach the side stays to the small holes in the chainplates which are near the aft end of the cabin. This attachment is made using the stay adjusters located on the ends of the stays. The first time you raise your mast, set the stay adjusters to be as loose as possible to be certain the mast goes up easily. Next, make sure the forestay is free and clear and that its turnbuckle is attached to its lower end. Also check the halyards to make are that both ends are secured near the foot of the mast so that you can reach them when the mast is up. Check all cotter pins or rings to be certain they cannot slip out.
The first tine you raise your mast, you will have to attach the inboard ends of the spreaders to the fittings on the mast. This is a simple clevis pin - cotter pin connection. (Spread the cotter pin).
Before raising the mast, remove the forward pin from the mast step. Then engage the mast step hinge to the mating part on the foot of the mast itself. Once this connection is made and the side stays are attached as explained in the previous paragraph, you can walk to the back of the cockpit, grab the mast and then, walking forward, bring the mast to a vertical position. (If the boat is on a trailer, be sure the bow is tied down and the trailer tongue is prevented from tipping up before you move to the stern.)
Once the mast is up, you must fasten the forestay to the top hole in the bow chainplate using the turnbuckle. Since the 16 mast is a deck stepped mast and does not have any support other than the three stays, it is important when you are attaching the forestay (or if you are ever adjusting any of the stays) to hold the mast firmly by hand so that it will not topple over. Once your mast is up, we suggest adjusting the various stay adjusters so that the mast has a slight aft rake (tilt) and so that the stays are taut with the mast leaning neither to starboard or port. The rig can be tightened to achieve proper tension by tightening the forestay turnbuckle. It is not recommended that the rig be set up "drum tight" however, merely sufficient tension to avoid the mast slipping around is adequate.
CAUTION: When your mast is up, check before moving the boat around, particularly when on its trailer, to make certain there are no overhead power lines or other wires which may come in contact with the mast or rigging. Each year fatalities occur due to electrocution caused by masts and power lines making contact.
Before launching, drain any accumulated water from the hull by using the drain plug in the transom, and retighten this hull drain plug.
LAUNCHING
Before launching the Newport 16, be sure the swing keel is all the way up and the hull drain in the transom tightly closed. If you are launching from a ramp, leave a line on the bow to control the movement of the boat and be careful as the boat is launched to keep it centered on the trailer. If you will be launching from a hoist or crane, we suggest you obtain the 16 lifting sling. This is a stainless steel bridle which connects to the large holes in the side stay chainplates and, with a line, to the eye straps an the transom.
With the boat in the water, fit the rudder and tiller. The rudder is installed by merely slipping the rudder pintles into the gudgeons in the transom. Turn the rudder lock on the transom. so the rudder cannot float up off the gudgeons. The tiller is then slipped into the rudderhead and secured by a cotter pin so the tiller cannot accidentally come out of the rudderhead.
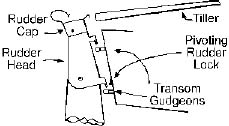
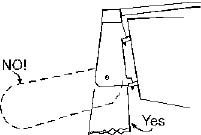
CAUTlON: Your boat is equipped with a lifting rudder which pivots for sailing up to a beach or in shallow water. It is important that the blade be kept in the full down position during all sailing, and that it be allowed to float up only temporarily during launching or beaching, grounding, or to slip weeds off the blade.
During these operations, do not exert anymore pressure on the tiller and rudder assembly than absolutely necessary, since the load on the rudder blade and casting increase tremendously when the blade is allowed to trail aft instead of being kept all the way down, and breakage could occur if this is done.
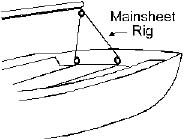
Next, rig the boom by sliding the gooseneck into the mast groove. Reeve the mainsheet by passing the sheet through the mainsheet cleat on the thwart, then up to the block (pully) in the middle of the boot, then aft to the block on the end of the boom, then down to the block on the seat across the cockpit to the opposite block, then finally to the tang on the end of the boom where you should make it fast with a bowline, a figure 8 knot or an overhand knot in the other end of the mainsheet prevent the sheet from accidentally unreaving.
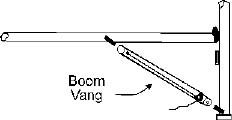
If you have purchased the yang, this is attached to the boom and by a tackle to the bail on the mast near its foot. The yang is normally tightened down according to the wind velocity. Use little tension in light airs and greater tension when the wind is stronger.
Next, attach the jib. The Jib tack is secured by a tackle to the lower hole in the bow chainplate. Then the sail snaps are out on the forestay. The halyard is attached to the head of the sail by its tackle and the jib sheet is attached to the clew cringle by means of a ring hitch made at the middle of the sheet. One half the jib sheet will lead through the port fairlead on the cockpit coaming. Tie over-hand knots or figure 8 knots in each end of the sheet to keep them from pulling through the fairlead accidentally. Before raising the jib, glance aloft to make sure the halyard is not fouled, and make certain the boat is heading more or less into the wind.
To fit the mainsail, install battens into the batten pockets. There are three battens in the 16 mainsail. The upper and lower battens are approximately 20" and 24" long, the middle batten is 30" long. When the battens are inserted into their pockets, an elastic in the inner end of the pockets will hold the batten in place against the roach of the sail.
Run the mainsail out along tile groove in the boom and attach the corners of the sail to the boom. The tack is attached to the gooseneck by a pin on the gooseneck and the clew is attached by an outhaul line, and secured to the cleat near the end of the boom.
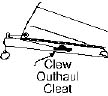
Attach the outhaul line to the cringle in the corner of the sail using a bowling, then pass the line through the eye in the end of the boom and secure it to the cleat so that the foot of the sail is just snug. Next, attach the halyard shackle to the headboard of the mainsail and insert the boltrope at the headboard into the mast groove making sure the sail itself is not twisted.
Before hoisting the sail make sure the boat is heading into the wind.
After examining the halyard to make sure it is not fouled and releasing the mainsheet, boom yang (if you have one) and downhaul, hoist the main to the top of the mast by pulling on the halyard which runs through the cleat at the bottom of the mast on the port side, and cleat the main halyard using this cleat on the mast. Hoist the jib in a similar manner and cleat the jib halyard to the cleat on the starboard side of the mast. You will find it convenient to store the halyard tails by coiling them and stuffing them under the part of the halyards just above the cleats on the mast.
The final operation in setting the mainsail is to secure the downhaul line to the gooseneck and to cleat it with moderate tension on the cleat mounted below the gooseneck on the mast.
SAFETY
Newport 16 with its ballast and foam flotation is about as safe as a boat of this type can be. Nevertheless, proper seamanship and safety precautions should always be followed to avoid accidents.
Wearable life jackets should always be aboard and should be worn whenever winds are brisk and while single-handling the boat under ANY conditions.
SAILING TIPS
You are now ready to sail your 16. You will find the 16 has a great deal of stability.
Normal caution such as easing the traveler to leeward and releasing the mainsheet in very strong gusts should prevent capsizes in even the strongest winds. If you find the wind so strong that you seem to be overpowered, lower your jib and sail the boat under the mailsail alone.
To avoid being knocked down when sailing in strong winds, always hold the mainsheet in your hand rather than cleating it so it can be eased instantly in strong puffs.
To jibe (turn so that the stern passes through the eye of the wind) in strong winds, make sure the board is not down more than 1/3. Shift your weight as the boom comes over and start and end the jibs with your mainsheet out so that the boom makes a 60º angle with the centerline of the hull. Keep your crew weight aft and duck when the boom flies over. Push the tiller firmly and continue to turn the boat so that at the completion of the jibe you are headed with the wind directly across your beam. Practice jibing in light airs. Avoid jibing in strong winds, but come about. (turn with the bow into the wind) whenever possible.
You can further reduce sail area in very strong winds by rolling a reef in your mainsail. To do this, remove the sheet from the midboom mainsheet block then slack off the main halyard about a foot. Pull aft on the boom to disengage the lock on the gooseneck and rotate the boom, thus rolling up the sail around the boom like a window shade, When the sail has been rolled enough to take up the slack along the luff of the sail, let the boom move forward so it will lock itself. To reduce the main still further, you can repeat the operation. To sail with a roller reefed sail, trim the sail directly from the end of the boom.
TRAILERING
When trailering your Newport 16, we strongly advise easing the brake winch slightly so that the weight of the swing keel is carried on the trailer rollers or bunks. Otherwise the severe jolting loads and vibration which can occur during travel, particularly over rough roads could cause breakage of the wire or other arts of the hoisting mechanism.