I wrote the manual years ago. It is presented here for information purposes only. Sorry for the layout, it was done in Microsoft Word.
|
Materials
List Per Boat (2) sheets
1/4" ACX plywood (4'x 8')
(4) 16'
long 1x2 (clear) (1) 6'
long 1x6 (good quality) (2) 8'
long 1x2 for scrap frame (1) 8'
long 2x4 (good quality) (8) 1"
and (16) 2" coarse thread drywall screws (300)
#6 hex head sheet metal screws
(300)
3/4" fender washers 20 oz
Gorilla Glue (or Elmers knock-off)
Wood
Putty 60 grit
and 120 grit sandpaper 2-4 oz
Paint Thinner (1) quart
Exterior Primer paint - oil or latex
(1) quart
Exterior House paint - oil or latex (6) 1"
long nails |
Tools
Needed During Construction Electric
Drill w Philips bit, #6 hex head driver, #8 countersink wood screw
bit Adjustable
bevel Pens Measuring
Tape Hand
Saw Electric
Jig Saw Orbital
(finish) sander (one per builder) Hand
Plane (one per builder) Paint
brushes Mixing
Cups Hammer Rags
|
Pattern to
be cut from 2 sheets of 1/4” ACX plywood
Building the CBC
The canoe consists of the following major components:
The Frame (bulkhead)
The frame is the central support structure. The sides and bottom are glued to the frame. The shape of the frame sides gives the shape of the canoe. The frame consists of 7 pieces:
· (4) Braces - made from a 2x4
· (1) Frame Bottom made from a 1x6
· (2) Frame Sides - made from a 1x6
The braces attach the sides to the bottom and hold the sides out at a 70º angle. During construction, the tops of the frame sides are held apart with a temporary brace. This temporary brace is made from a 1x2 that can later be used in the construction of the seats.
The Sides (strakes)
There are 4 pieces that make up the sides of the canoe. They are all the same shape and size and are cut from 2 sheets of ¼” ACX plywood.
During construction, the sides are held apart with temporary braces to force the canoe sides into the desired shape. These temporary braces are made from a 1x2 and can later be used in the construction of the seats.
The Stems
The stems are used to connect the sides together at the front and back (bow and the stern) of the canoe. They are cut from a 2x4.
The Chine Logs
The 2 chine logs form the seam between the sides and the bottom of the canoe. They provide the gluing surface for attaching the bottom to the sides and also provide strength and rigidity. They made from 16’ long 1x2s.
The Bottom (garboard)
There are 2 pieces that make up the bottom of the canoe. The bottom pieces are cut from the plywood left over after the sides are cut. The shape of the canoe after the chine logs have been installed determines the dimensions of the bottom pieces.
The Rub Rails (gunwales)
The 2 rub rails run along the top outside of the sides, providing strength, rigidity and protecting the sides from damage. They are made from 16’ long 1x2s.
The Knees
The knees are the end caps at the bow and stern. They help hold the sides together and protect the points of the bow and stern during handling. The knees are also used as handles to carry the canoe. They are made from a 1x6 (or whatever suitable scrap.).
The Skeg
The skeg runs lengthwise along the exterior bottom of the canoe. The primary purpose of the skeg is to protect the bottom from contact with rocks and gravel. The skeg also provides support for the bottom of the canoe and helps the canoe track (stay on course while being paddled). The skeg is made from a 16’ long 1x2.
Extras:
Paddles
Either traditional canoeing single paddles or double paddles like those used in kayaks are easily from inexpensive materials.
Carrying Yoke
Transporting a canoe on dry land can be problematic. Two people carrying a canoe can be impractical over rough terrain. One adult can easily carry a canoe at its balance point with the use of a yoke.
The yoke is installed at the center of the canoe, across the frame. During construction, the top of the frame is held apart with a temporary brace. Changing that temporary brace into a permanent fixture when you build the frame is the easiest way to incorporate a yoke into your canoe.
A removable yoke would allow you to carry different configurations of cargo and passengers. To make a removable yoke, attach sockets onto the frame for the yoke to fit into. Again, this is best done when you are building the frame prior to the construction of the canoe.
Seats
Canoes were originally intended to be paddled from the kneeling position and did not have seats, and they are not necessary in this design. However, paddling a canoe without seats is an uncomfortable and wet experience.
Seat placement is determined by the anticipated use. The permanent installation of seats can preclude a canoe from being used from some activities - Installing 2 seats makes it difficult to comfortably carry 3 people. Installing 3 seats makes it difficult to use the canoe to carry one person and cargo, etc.
One solution for a multi-use canoe would be to make some small, removable stools, then change the seating configuration as desired.
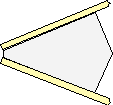
The
Frame
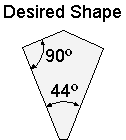
The frame is the central piece of the canoe – it makes the waterproof the seam between the pieces of the sides the pieces of the bottom. The angle of the sides of the frame determines the cross section shape of the canoe and the width of the bottom of the frame determines the maximum width of the bottom of the canoe.
|
The frame consists of 8 pieces: (4) Frame Braces - from 2x4 (1) Frame Bottom - from 1x6 (2) Frame Sides - from 1x6 (1) Top Brace – from 1x2 |
|
|
|
|
|
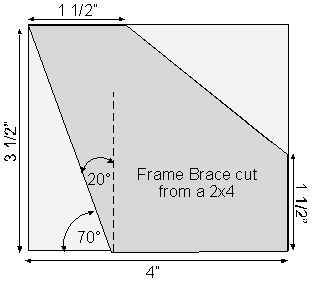
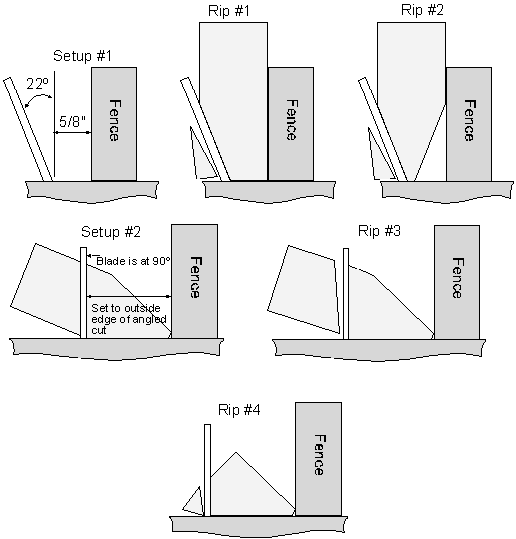
Cutting the Frame Braces You want to end up with 4 braces, each with a 20º angle across the width of one end and excess material removed from the opposite corner. · Start with 4 pieces of 2x4, each about 4 inches long. · With a chop saw or table saw, make a 20º cut across one end of each piece. · Lop off the opposite corner, leaving 1 1/2 inches at the corners for strength
|
|

Cutting the Top Brace
|
You want to end up with board with a maximum length of 29 5/8” and a 20º bevel across the width of each end. |
|
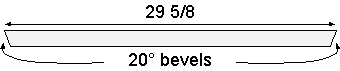
· Start with a 1x2 at least 30” long
· With a chop saw or table saw, make a 20º cut across the width of one end.
· Place a mark 29 5/8” along the long edge.
· Cut an opposing 20º bevel at the mark.
Cutting the Frame Bottom
|
You want to end up with a board with a maximum length of 21 5/8 inches and 20º bevels across the thickness of each end. |
|
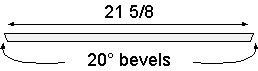
- Start with a 1x6 of good quality at least 22 inches long.
- Make a 20º cut across the thickness of one end of the board.
- Place a mark 21 5/8” along the long edge.
- Cut an opposing 20º bevel at the mark.
Cutting the Frame Sides
|
You want to end up with 2 boards, each with a 20º bevel on one end and a maximum length of 10 1/4 inches. |
|
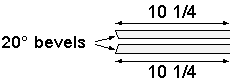
- Start with 2 pieces of 1x6 of good quality, each at least 11 inches long.
- Place a mark 10 1/4 inches along the long edge of the boards.
- Make a 20º cut across the thickness of one end of the boards – leave the other end flat.
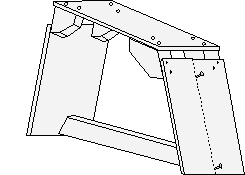
Assembling the Frame
|
Glue-n-Screw the Frame Braces to the Frame Bottom. Be sure to match the beveled edges |
|
|
Measure up 1 1/4 inches from the bottom of the frame and place a mark on each brace. |
|
|
Beveled edge on top – bevel out - flat edge on the bottom. Glue-n-Screw the frame sides at the mark. |
|
|
Center the top brace on the frame sides. Line up the tops of the brace and the frame sides. Do not glue – just attach with screws. |
|


The Strakes, the 4 pieces that make up the sides of the canoe, are all identical in size and shape and are cut from 2 sheets of 1/4 inch ACX plywood.
Lofting (drawing the pattern)
Lofting – the drawing of the outlines for the strakes – is done on the rough side of the plywood. The patterns are drawn and then cut with a jigsaw or circular saw.

Marking the Stations
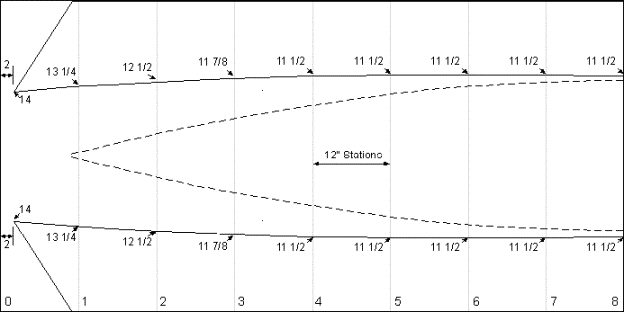
Stations are reference lines that run across the plywood the short way. Measurements are marked at each station, and the marks are connected to form the pattern.
- Mark the stations 12 inches apart along the long edge of the sheet of plywood, numbering them 0 through 8 going left to right.
Measuring the Marks
Along both sides, measure from the outside edge at each station and put a mark
Station 0: In 2 inches, up 14 inches
Station 1: Up 13 1/4 inches
Station 2: Up 12 1/2 inches
Station 3: Up 11 7/8 inches
Stations 4 through 8:Up 11 1/2 inches
For the Bow/Stern angle:
Put a mark 1 inch to the left of Station 1, Connect to the Station 0 mark with a straight line.
Drawing the Pattern (for a simple design like the CBC, you can simply connect the dots)
- Drive a nail into each station mark
- Clamp a batten – a long piece of thin wood – to the nails
- Trace along the edge of the batten to get the shape
This method results in nice, graceful curves between the station marks.
Cutting the Pattern
If you loft the pattern onto both sheets of plywood, cut the strakes one at a time. When finished, clamp them all together and sand along the edges to make them identical.
Since all the strakes are exactly the same, you could just loft onto one sheet of plywood, then stack the sheets face to face, clamp them together and cut through both sheets at the same time. MAKE SURE THEY ARE FACE TO FACE AND CLAMPED SECURLY.
Pros and cons of cutting methods |
||
|
|
Lofting on both sheets |
Lofting on one sheet |
|
Pro |
· The sheets are easier to handle during cutting. · If you make a mistake, it only affects one strake |
· Only have to loft once · Matched strakes have exactly the same shape
|
|
Con |
· Takes twice as long to loft and cut |
· More difficult to handle during cutting · Mistakes affect 2 strakes |
Cutting the Stems
|
· The stems connect the ends (bow and stern) together. During construction, they need to be long enough to extend all the way through the bottom and top of the strakes – they will be trimmed later · Start with a 4 foot long 2x4 of good quality |
|
Cutting the Stems
|
|
|
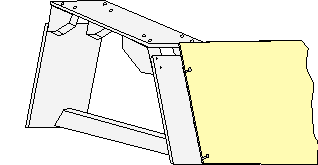
Attaching the Strakes to the Frame
This is a very important stage. The strakes have to be lined up correctly with the frame to keep them straight and true. The strakes are attached with the good side out.
|
· Turn the frame bottom side up (the canoe is assembled upside down.) · Draw a line down the center of the outside of the frame · Tack two guide nails along the line
|
|
|
· Apply glue to the area of the frame that will be covered by the strake · Place one of the strakes – good side out and bottom side up – against the guide nails and press it firmly into the glue
|
|
|
· Line up the inside edge of the strake with the bottom of the frame · When lined up correctly, attach the strake with screws · Remove the guide nails and attach the second strake · Repeat with the strakes for the other side |
|
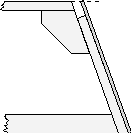
Making the Bow and Stern (attaching the ends together)
|
· The strakes are connected together by the stems; apply glue to the sides of the stem · Line up the edge of the stem to the edge of the strake, making sure the stem extends past both the bottom and top of the strake. · Hold the stem firmly against the strake and attach with several screws · Pull in the other strake and attach · Repeat at the other end - Check for true and adjust before the glue sets. |
|
Measuring the Chine Log
- Use an Adjustable Bevel to determine the angle of the stem
- Mark the angle on one end of a chine log
- Cut the angle
- Insert the angled end of the chine log into the boat, tight up against the stem and held against the strake
- Mark where the chine log meets the frame
- Turn the chine log around and repeat. this time marking where the chine log comes out of the frame
- The distance between the two marks is the amount you need to cut off the non-beveled end of the chine log
- Repeat on the other side with the other chine log
Attaching the Chines
- Apply glue to the correct side of a chine log
- Insert the chine log, bending the ends down so you can get the chine inside the boat.
- You will probably need to pound the chine log into the notch in the frame. Make sure to seat it completely
- The chine should stick up about 1/4 of an inch above the edge of the strake. Make sure the excess is even all along the length of the chine.
- Starting in the center of the boat, attach the chine to the strake with screws placed about every 4 inches
- Repeat on the other side with the other chine
Attaching the Gunwales
- Turn the canoe right side up
- Mark the center of the gunwale
- Apply glue to one side of the gunwale
- Line up the middle of the gunwale with the middle of the boat
- Clamp the gunwale to the strake - use lots of clamps
- You will be driving the screws from the inside of the canoe through the strake and into the gunwale. Starting as close as possible to one side of the frame and working out towards the ends, attach the gunwale to the strake
- Cut off the excess at each end of the gunwale
- Repeat with the other gunwale on the other side
Trimming the Stems
- When the glue has cured, lay a handsaw flat along the chines and cut the excess portion of the stems
- Turn the canoe over and repeat
Planing the Chine Logs
This is going to form the seam for the bottom of the canoe, so take your time and don’t gouge
- Turn the canoe upside down
- Remove the screws from the strakes and chines
- Using long strokes plane the chine log and outside edge of the strake down until they are flat
- If desired, attach coarse sandpaper to a 2x4 and sand smooth both chines at once. This will insure the bottom of the boat will fit flat against the chines.
Marking and Cutting the Bottom
You will install the bottom in 2 stages: Marking and cutting one end, then the other.
- With the canoe upside down, measure and mark the center of the frame
- Drive two guide nails into the center line
- With the good side of the plywood facing up, place one of the bottom pieces against the guide nails
- Hold the bottom panel tight against the chines and trace the outline of the canoe onto the panel. Leave some room between the line and the edge to account for cutting errors - you plane and sand the edge in the next step
- Remove the bottom panel and cut out the bottom piece. Make sure to stay outside the line
Attaching the Bottom
- Apply glue to the part of the frame that will be covered, the chines and the stem end.
- Place the bottom panel - good side up - against the guide nails and line it up with the chines
- Starting in the center of the frame and working out, attach the bottom panel to the frame with screws and fender washers spaced about 4 inches apart - make sure the other end stays lined up correctly
- Starting a the center of the boat and working down both sides towards the end attach the bottom panel to the strakes with screws and fender washers spaced about 4 inches apart
- Remove the guide nails and repeat Marking and Cutting the Bottom and Attaching the Bottom with the other panel.
Planing the Bottom
- Plane the excess off the bottom pieces. To prevent tearing the plywood, make sure you run the plane “down hill” along the grain.
Planing the Gunwales
- Using long strokes, plane any excesses along the top of the gunwale and strake. When planning the along the strake, make sure to run the plane “downhill” along the grain.
- Shape the gunwale anyway you wish, but make sure the last 6 to 8 inches near the stem are planed flat - horizontal with respect to the ground. This is where the knees will be attached
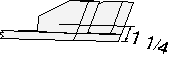
Attaching the Knees
The knees are small endcaps over the ends of the canoe. They protect the top ends of the canoe from damage and act as handles for carrying
- Take a piece of 1x6 and lay it lengthwise over the stem and down the gunwales. Leave an inch or so excess over the end of the canoe
- Trace the shape of the outside of edge of the gunwales and end onto the 1x6
- Turn the 1x6 over and draw a line connecting the two points where the traced shape runs off the board
- Cut along the lines
- Drill pilot holes on each corner of the knee
- Countersink the pilot holes deep enough so the head of the screw will be below the surface of the wood
- Apply glue to the stem end and area of the strakes and gunwales that will be covered by the knee
- Use 1” coarse thread drywall screws to attach the knee to the canoe. Make sure the screw heads are below the surface of the wood
Preparing for Initial Sanding
- Make sure all screws (except the drywall screws for the knees) are removed
- Scrap off any excess glue
- Fill all screw holes and the holes in the knees with wood putty
- Fill any voids, gouges, or defects with wood putty
Initial Sanding
- Using coarse (60 to 80 grit) sandpaper sand all surfaces. Make sure you remove any excess glue and putty.
- Get into corners as well as possible. Use an orbital sander where practical to make this process go faster
- Take your time - the time you spend here directly affects the appearance of your canoe
Final Sanding
- Using medium (120 to 150 grit) sandpaper, sand all surfaces.
- Get into corners as well as possible. Use an orbital sander where practical to make this process go faster
- Take your time - the time you spend here directly affects the appearance of your canoe
Initial Painting
All wood will rot once it comes in contact with water. The only way to protect your canoe is to get the wood to soak up as much paint as possible. Use exterior grade primer.
- Mixing paint or varnish with paint thinner allows the wood to soak the paint deeper into the fibers. This only works on the first coat of primer.
- Mix exterior grade primer paint with paint thinner - use the manufacturer’s specifications or mix at a ratio of 4 parts paint to 1 part paint thinner (20% thinner) to 1 part paint to one part thinner (50% thinner).
- Paint the entire canoe. Paint the inside first, then flip it over and paint the outside
- Allow the paint to cure per manufacturer’s specification
- Lightly sand the entire surface with medium (120 to 150 grit) sandpaper
- Paint the entire canoe with exterior grade primer again.
Final Painting
Apply as many coats - in as many colors - of exterior grade paint as you wish. Just make sure to the primer paint is completely covered.
- Always paint the interior first, then flip the canoe over and paint the exterior.
- Always allow the paint to cure between coats per the manufacturer’s instructions.
- Sand between coats per manufacturers instructions
Allow the paint to cure for at least a week before putting the canoe in the water.